Maine Central, Lamoille Valley

Maine Central, Lamoille Valley
Click image to link to my web site, nekrailroad.com

Monday, December 23, 2013

Free-mo at Bordentown, NJ Train display

For the second year, Free-mo modules were displayed at the annual Bordentown, NJ holiday train show. This show is a free display of operating model railroads open on weekends from Thanksgiving to New Years. Over 4000 people come through the old city hall building to look at the trains, so it is good exposure for the hobby and Free-mo, which represents scale model railroading amongst the Lionel, American Flyer and other display layouts.

This year a curved layout with a peninsula was fit into the half of the room we were allocated. This allowed some operation and gave the visitors the ability to see and hear trains move freight between the railroad barge and the interchange yard.

Thanks to Mike Prokop and Bob Liberman for coordinating the Free-mo participation and manning the layout for 2 weekends. Modules by Mike Prokop, Bob Clegg and myself were set up.
An overall view of the layout constructed.

Mike Prokop's module featuring street trackage mainline with a spur leading to the yard and rail barge.


The rail barge module representing Camden's rail-marine operations of the 1950s.

A new 90 degree curved module made its debut, allowing us to join one interior section of my module to  the others in the space we had available. It was a close fit up against the window and radiator, but Free-mo showed its versatility again in allowing us a neat layout to display and operate!

Friday, November 29, 2013

Busy November!

Coming back from the Laconia NER Convention, I stowed the modules under the layout, covered them with plastic and prepared for the open houses in November. This involves general cleaning up, preparing the run through trains with (hopefully) reliable freight cars that are good to run for 5 hours start each day, and putting up the assorted signs and info that othert model railroaders like to peruse to understand what the layout is all about.

I had about 75 visitors over the first two days, a Sunday followed by a Saturday. Good weather may have impacted the numbers a bit, and with only a bit of publicity this year, probably less of the general public. Certainly there were plenty of return visitors that were good to see. Bill Rose reminded me that I still have not built the ET&HK Ide building yet, as he does each year! I also had a few children and one that quite literally demanded to run a train. Once I prepared a Lamoille Valley passenger extra for him, he settled in and ran the train quite nicely, paying attention to speed and even stopping at the station in Sheldon Jct.

As usual, I did not remember to take too many pictures, but I did get one when there were about 5 people looking around things. Only two can actually be seen however...including Bryan who visits each year and was able to get his Dad down as well.

During the open house, just one picture taken. I always forget to take pictures and get busy talking to everyone!

The following weekend saw about 80 nor so members of the NJ Division NMRA stop by after the local Division Meet. This was a much more crowded and question filled day, but still lots of fun.

I closed out the month by getting a visit in to Ken McCorry's layout. It had been about 8 years or so since I had been there, back when it was Conrail and Penn Central. Now all Pennsy, the layout is just as big as I recall it, and perhaps larger. One picture I took was this quite impressive dispatchers "office". That's a lot of layout to dispatch!

2 chairs probably means 2 dispatchers which equals Big layout!

Monday, October 28, 2013

NER Laconia Convention Report

Although I planned to update the blog during the weekend of the convention, I found myself just too busy to do so.

I headed up to New Hampshire and spent Thursday morning driving up to Franconia and Crawford Notches. Big difference in scenery - the Laconia area was pretty much at peak color - the Notches looked leafless and ready for winter. Still it was cool to visit these areas, and I did get a picture of the Crawford Notch state park sign I needed for the layout. I also headed up the road to where we camp in the summer, but the campground was closed due to the government shutdown.

Here are a couple pictures. First is the Crawford Notch station, which really shows the lack of foliage on the hillside. Next is a Mt. Washington Cog Railway locomotive and passenger car, relocated down to the intersection of US302 and Rt. 3 in Twin Mountain. I assume the steam locomotive is now surplus as they converted from coal power to diesel up on the big mountain. In the third picture, further south, you can see how much more foliage there is beside this Boston & Maine bridge along the Pemigawasset River.


Here is a link to all the non-train photos I took in case you want to check them out.

http://www.flickr.com/photos/69256547@N02/sets/72157636708222704/

Thursday afternoon was set up time for the Free-mo layout. It was tough to really get a picture of the overall layout as it was long and linear. I think it was in the neighborhood of 160 feet of mainline. The picture here shows my module being operated by a guest, with a large portion of the layout going down along the wall, turning right and continuing along that wall to the doorway. Not seen is the large return loop that my module fed into.


A full set of Free-mo layout pictures are up on Flickr, so I'm not going to repeat them here. Here is the Flickr link:

http://www.flickr.com/photos/69256547@N02/sets/72157636769787906/

The New England Free-mo guys were great and really had their stuff planned out. Set up was quick and efficient. My module fit in with no issues and James Koretsky's CAD planning fit the layout into the room perfectly. Fred Hessler came up with a great operating scheme and we hosted numerous sessions Friday and Saturday. I had a great dinner at a nearby restaurant with the guys Thursday night. Friday I presented my clinic on the St. J & LC, which went OK, although it was a bit disconcerting to have such knowledgeable people in attendance, many who know more than I do about what I was presenting, and I know as a result I was a bit off. Hopefully everyone enjoyed it and learned a little something. Saturday, after more Op sessions, we took the layout down, and I attended the banquet. I left early Sunday in order to get home for some other planned activities.

All in all a really good time. Taking the modules to another group and setting up again proved the value of Free-mo. We had no issues integrating my modules into another group's modules. The weather was really nice, the convention site terrific, and just being up in New Hampshire in October a real treat.

Wednesday, October 02, 2013

November Open Houses

This November I will again be opening my layout up for visitors during Model Railroad Month as part of the greater MD-DE-PA-NJ Open House Event. A complete list of open layouts is at the model railroad open house web site.

My layout will be open from 12 noon to 4pm on Sunday November 3, 2013.

It will be open again from 12 noon to 4pm on Saturday, November 9, 2013.

There are a large number of NJ area layouts open both these days, so it is worthwhile to plan your route along the I-295 corridor to get the most bang for your buck. There is one layout 10 minutes to the west of me, and another 10 minutes to the east, so you can easily see those 3 layouts on one of the days.

One more open house will occur as part of the NJ Division's Meet in nearby Delanco on Saturday November 16, 2013, from 1pm to 5pm. The Meet itself will be in the morning with clinics, and other area layouts will also be open. See the Division's Web Site for more info on that event.

Monday, September 30, 2013

NER Convention Oct. 17-20, 2013

I will be up in Laconia, New Hampshire for the NER NMRA Convention, Tracks to Lakeport. Besides being up in my modeling area, at the height of Fall, there will be a large Free-mo layout constructed on site.

New England Free-mo and members of the Seacoast Division NMRA have a nice point to loop layout planned, and my Woodstown Jct. will be included, just to the left of the return loop in the drawing below:


There will be scheduled Ops Sessions over the layout during the weekend, along with time for free running. I'm looking forward to being there, and if you are going also, please stop by and say hello!

I'll post my usual convention report during the weekend as usual to this web log, so check back for updates.

Monday, August 12, 2013

Picture in MRH Magazine e-mail

This was cool - I posted some of my rock work pictures to a Weekend Photo forum at Model Railroad Hobbyist magazine. They selected one of my photos for the heading in their weekly e-mail update sent out to all subscribers. Neat!


Friday, August 09, 2013

Crawford Notch Scenery Progress

As I mentioned in my post in July, I started on some scenery in the Crawford Notch section of the layout. This section is one end of the layout that curves into staging. The Notch itself and the MEC's Gateway cut through the rocks is where the scenery starts (or ends depending on how you look at it). Having gotten all the basic landforms  in place, I turned my attention to the rock molds that would make up the dramatic entrance/exit for Maine Central freight trains on the layout.

I have a couple of Woodland Scenics molds, but like a lot of their products, I am finding them underwhelming as I do more layout building. They are a great company but I have been finding some really nice alternatives to their stuff. One such item is the rock molds from Sterling Models of Hardwick, Vermont. I picked up one at the Springfield train show and after one casting I knew I needed more of their molds. So I ordered 2 more and after they arrived I started casting rocks for this scene.

I did a few in the mold and let them set up, but I found that it was going to be real tough to just place them into the basic scenery I created. So on the one side, I cut some into pieces and glued them onto the foam, and used Sculptamold to fill in the gaps. On the larger mountain side, I cast the rocks in the mold, but before they totally set up, I pushed them into the scenic base, curving them slightly to fit. The result was that I was able to get to better fit the geography of the scene I created. Here are some pictures:

Here you can see the basic ground cover on the hillside as well as the field behind the tracks. Up front is part of the Rt. 302 highway that will be in the scene.

A look at one of Sterling Models molds and the resulting casting. They work great, clean up easily and have no problem getting castings out of the mold. They are flexible enough to contour to your scenery before fully set and they are strong and have worked great multiple times.
Here is a picture of the prototype and my rockwork castings.

Here is a straight into the staging look that will actually be tough for operators and visitors to see as my workbench will keep people from getting a look like this without really trying. Even still the rock work really helps conceal the train going through the backdrop.
After this set up for a few days, I went back and worked on coloring the rocks. I used the techniques described by Mike Confalone in Model Railroad Hobbyist magazine and the accompanying videos. Basically you use black RIT dye and alcohol to stain the rocks and then oil paints and turpenoid to add colors. Next some chalks are brushed on. It was my first shot using these techniques and I did learn a fe things, but overall I am happy with the results so far. I still am waiting to add some gray and white chalks as I do not have these yet.

With that done I really wanted to get the scene finished, as least around the rock work. So I added underbrush and built some trees. All that remains is ballasting and the addition of some other tree types.

I added a blue sky section on the gray wall to help the scene. Most of the trees are in place although I want to add some pines that I still need to construct.
A closeup with RY-2 reaching the top of the grade at Crawford Notch before stopping at the station to sign the train register book.

A slightly higher vantage point. It clearly shows the kink in my trackwork that I will need to fix before ballasting!
I do want to get back to track work, but this scene has been a lot of fun. I do have scenery on other parts of the layout, but I feel I am still experimenting and finalizing methods. Here I feel pretty happy with the results and look forward to ballast and some weeds to finish it off. I doubt the whole hill side will be tree covered before November, but at least there is enough for some good photos and to give a sense of what the overall look will be like.


Thursday, July 18, 2013

Interesting effect

I recently purchased a Nikon DSLR and have started to try out its different features. One is interesting, called a "Miniaturization" effect. I think it is trying to do the one thing we try to avoid in model railroad photography - reduce depth of field.

While taking some pictures of a Conrail Shared Assets local from Camden out to Mt. Holly, I tried out the effect. The train had recently finished all switching work and the crew just grabbed some food across the street in Mt. Laurel, near Larchmont Blvd. First is a regulr shot I took, and then the "miniature" version:


Kind of makes it look model railroad-y. Not sure if I'll use this a lot, but something neat to try after taking some "regular" shots.

Sunday, June 30, 2013

Where's all the updates?

Well, I have to say I have been pretty neglectful on updating the blog. I had good intentions back in January to keep at it regularly, but lots of other things have kept me busy. This is not to say that there has not been any work on the layout or modules. Luckily, not true, although maybe not as much as I would like (which is usually the case, right?). There have been quite a few of non-train house-projects this year, and then some ramp up in activities with my band (check out Strange Brew), plus a good deal of nice weather that kept me outside more than usual. Anyway, all that aside, here is what has been going on.

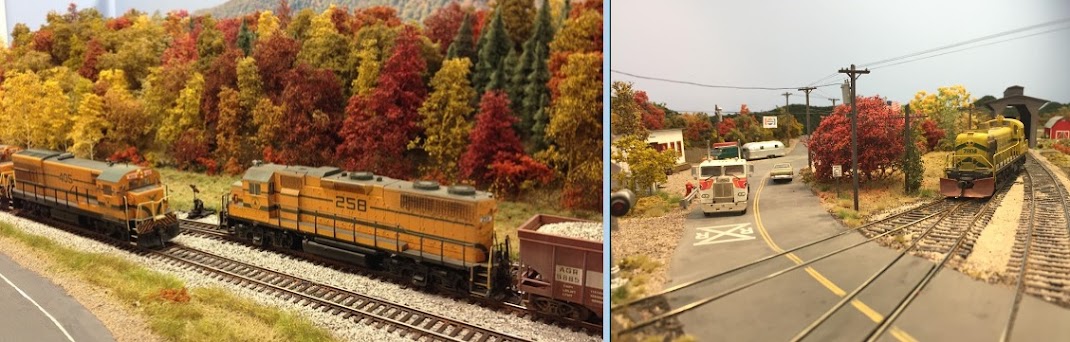
My last update showed work in Morrisville installing ground throws. With all those in I moved back to Groveton to get all the track installed, and then all those ground throws installed in the same manner - throwing them from the front edge with extended throw bars. Next I completed the B&M trackage in Whitefield, laying the sidings and tying the mainline into the diamond. I installed the ground throws and also put in some scenery base.

With a lot of track in place, I sprayed Rustoleum Camouflage paint in dark brown to give the track a basic covering. I'll do additional weathering and rail rust later, but this is a a good start, and it not bad even if you never get anything else done. Some pictures:

Rustoleum Camouflage paint for painting track

Groveton with all track in place. Just need to build that paper mill.

The B&M in Whitefield. this siding is for pulpwood loading. Here you can also see one of the laminated layout location signs I made up over the winter.

Further-away view of work in Whitefield for B&M. Two new sidings to the left, pulpwood siding on the right, and the main line to the diamond. All wiring done and ground throws installed.
Next, I turned my attention to some scenery. Although I wanted to keep on the trackwork and get it done as I set a goal, I felt inspired to rough in some scenery in Crawford Notch. This is one area that I want to look mountainous and is the first scene visitors will see when they come in the doorway. Using cardboard strip, I hot glued a basic landform in place, rising to the point where the Maine Central track curves and goes through the notch. I covered this with plaster cloth, then used some sculptamold to fill in areas and breakup any flat sections of foam. Pretty quick, it was all done in 2 sessions, so I don;t feel to bad about the diversion from tracklaying.

At this point I need a basic covering of paint and some ground cover. The actual tree application will take some time, but I knew this and it is really only the other tree-intensive location besides Sheldon Jct.  At least for the November open house it will be quite a different look than last year. Here is the aptly named White Mountains section on the layout:


Got trees?
The start of Crawford Notch, and the end of on-the-layout scenes for the Maine Central to Portland, Maine.

Here starts a transition between Crawfords and Whitefield. The Crawfords station will be on the upper foam section, and trees going down the hill lead to a road scene in Whitefield. The bridge carries the MEC over the B&M which is going to Groveton through a hidden section.

A better look at the road scene to-be. I wanted a good spot for a few structures close to the layout edge, and a grade crossing here with a few buildings on both sides seemed a good spot. Whitefield does have some buildings right at grade crossings like this, so while not an exact replica, it is how the prototype looked.
Next up will be working on trackage in Johnson, Vermont, which is directly behind the camera for Crawfords/Whitefield. this is along the LVRC and is a nice shelf area right now. Need to do a little subroadbed installation and lay track for the talc mill that will be located here. Then track in Sheldon Jct.needs to be finalized. Track is there, but I never really finished it and had the CV industry siding in place. That will leave Lydonville (my useful flat shelf work area) and North Stratford (on an upper shelf, also useful for storing stuff). It is getting closer to all track being in place, but I am behind my goal of getting it in place before summer. But overall, it is progress over six months where I did not get to much time to focus on model railroading.


Wednesday, January 09, 2013

Trackplan

I thought I would kick off the blog for 2013 with what has been the most requested piece of information people have asked for...a trackplan of the layout. Below is the basic plan. Not every siding and yard track is shown. Some are but most are not.

I am not really into drawing intricate detailed plans. I like to just build as I go. At some point I will refine this plan to accurately reflect each track.And as it is, not every mainline shown is in exactly the correct position relative to the wall for fascia. It gives you a pretty good idea of how things are laid out though.

Please note that the branch up to north Stratford is not shown at all. this would be over top part of the staging, through the wall and then above Groveton and parts of Gilman. This will require a separate drawing so as not to block and confuse the drawing relative to the lower tracks below this shelf.

This plan was drawn using Empire Express software for the Macintosh, a program I have had for close to 20 years. I would suggest right-clicking on image to open it in a new tab or window, and then you should be able to zoom in. Or you could save it to your desktop and open with your favorite image viewing software (I couldn't figure out how to make blogspot show the image larger right here without diminishing the quality). Enjoy!