Maine Central, Lamoille Valley

Maine Central, Lamoille Valley
Click image to link to my web site, nekrailroad.com

Saturday, December 03, 2011

Visitors From Virginia

On Saturday, December 3, I had two visitor's to the layout by special invitation. Marty McGuirk e-mailed me asking if he and Bernie Kempinski could stop by on their drive from Virginia up to northern New Jersey where they were visiting some other layouts and partaking in an operating session. Of course, I said! So I spent an enjoyable couple of hours discussing model railroading and showing my layout. Marty and Bernie even bought me lunch. Thanks guys! Here are a couple of pictures of me and my guests:
Mike and Marty
Mike and Bernie

Here a couple of shots Bernie took. It is always interesting to see what other people come up with when photographing my layout.


The shelf under St. Johnsbury always receives a positive comment!


I'll always try to accommodate anyone who would like to visit the layout. So just e-mail me if you are passing through and I will let you know if it is possible.

Sunday, November 13, 2011

National Model RR Month

As always, I open my layout to the general public during November as part of National Model Railroad Month, where the goal is to show off our great hobby. This year in conjunction with the open house, I worked with 2 local newspapers to publicize the event a little. Some layouts further south in NJ do this and regularly get a large number of visitors. For me and a few others in my area, just having the listing through modelrailroadopenhouse.com was only producing about 10 visitors during the 5 hours we were open. Not really making it worthwhile in my opinion.

The Burlington County Times ran a large article with a giant picture of my Hardwick, VT road crossing. The Courier Post had a smaller mention amongst a larger 2 page spread promoting Model RR Month. Here is a link to the BCT article with photos:

 BCT Article

 All in all, this was a success as each of of the 3 of us had anywhere from 8o to 100 visitors, and a large number of these were families with kids. So hopefully this will pay off in the future with more model railroaders join gin our ranks. As always, I forget to take a picture during these open houses as I am usually quite busy talking to everyone while keeping an eye on the changes.

Sunday, October 30, 2011

Timonium with Captiol Free-mo

I traveled down to Timonium, MD for the train show, again bringing my modules to connect to the Capitol Free-mo group. Despite the snow (in October!) on the way down, it was a nice time. The crowds were probably a little light because of the weather Saturday. It was another good demonstration of how well Free-mo works. We quickly assembled a sequence of modules for the weekend layout and had trains running in a little over an hour. My Woodstown Jct. modules were in the center and we ran some basic operations during the 2 days. Some photos:
More photos can be found at capitolfreemo.org, clicking on the Photos link from the main page. It was also fun to meet the many people at the show and explain what Free-mo is all about. I really enjoy hanging out with the Capitol guys and look forward to more shows in the future.

Monday, September 12, 2011

NJ Division Open House

On September 11th, I opened my layout for members of the New Jersey Division MER-NMRA. This happens about every 2 years as the Meet locations rotate throughout southern NJ. I am glad to do it because it is always a well attended event with lots of model railroaders that ask good questions and lead to nice discussions on layout building. This year was the best yet as I had over 80 people sign the visitors log (meaning a few more may have come through) in the period from 1 to about 4. The layout was open until 5, but by then most had visited and headed out to the other layouts. I have about 5 people the last hour. Of course I always forget to take any pictures because once the people start arriving I get real busy. The layout was built with 2 separate loops that both pass through St. Johnsbury. This was done specifically for open house events and even though I won't operate this way, it really makes it a lot easier for days like this. So I would definitely try to work this into a layout if at all possible. It is also nice when I just want to break in a loco or run a train for fun, watching pass through the different scenes. I will also have my layout open for the annual National Model Railroad Month open layouts coordinated through modelrailroadopenhouse.com. This is for model railroaders as well as the regular public. The open house will be Sunday, November 13th, 12 to 5. There are a number of layouts in the NJ area open that day, so you can make a nice day of it. I arranged for some local publicity as well with a couple of newspaper reporters and also had a video crew visit from phillyburbs.com. When those go online, I'll post some links here. The hope is that we'll expose our layouts to more of the public, a goal for Model Railroad Month. So if you can make work it into your schedule, please plan to visit it for the open house. If not, then there is always next November!

Monday, August 15, 2011

Focus on trackwork

Been busy most of the summer with other activities, but in August I was able to get back to working on the layout. After some initial clean up of the area, I looked around and tried to determine what I should focus on. There are plenty of things to do, but I am committed now to getting in all of the remaining trackage on the layout in order to host an initial operating get together. Not a formal session, but just something to introduce my layout to some local operators and run through the train schedule to see how things play out. I have a full operating plan on paper and in my mind, so I would like to see if it will really all come together as planned. (I imagine adjustments will be made).

First up was to tackle a staging deficiency I identified after I started to revise some of my Canadian Pacific train operations. Originally I built Newport staging with 3 separate tracks. But with the addition of an Amtrak train to 2 CP locals and 1 through freight meant I would have trouble staging 4 trains. I could see a (somewhat) easy remedy by adding a new track, but it meant working in a tough location under benchwork for Gilman, VT above. Over the course of 3 nights I fit in subroadbed, Homabed and track, cutting in a new turnout and adding a new Tortoise switch machine. It was not easy to work here and I would recommend building hidden staging completely before adding stuff above it! Now I have space to stage either the Amtrak train or one of the CP locals, and the other 3 tracks for the remaining trains.

With that out of the way, I turned my attention to the area above, figuring out the track layout and building arrangement for the paper mill in Gilman. Using some prototype information about the real Gilman mill sent to me from fellow MEC modeler Cam Green, I determined that long sidings can be used to handle multiple car types at different spots. I know of this concept but sometimes you just get hung up on one siding having to be for one purpose and used to hold all the cars for that purpose.

So I have one long siding that will handle inbound pulp paper boxcars and also kaolin tank cars. And further up a siding that splits off will hold outbound paper loads, with extras on the main siding. This overcame an obstacle I had trying to fit in multiple turnouts. With less turnouts, I have more track to spot cars. I also have another siding to handle covered hoppers of starch and hoppers of coal. These 3 sidings along with one long passing siding (which will also hold cars off spot for a local to spot later) seem like not too many tracks but actually serve all the needs of the mill and actually follow the prototype fairly well. Here are two overhead kind of shots with the building pieces mocked up and some cars spotted in appropriate places.

Then I moved over to East St. Johnsbury where I put in 3 sidings. Two long sidings will handle Maple Grove Farm food products and Ciment Quebec (cement) and another will be used for a pulpwood loading siding. I removed the temporary trackage and put in the three turnouts and fit in new sections of code 83 track between them. I also added under track uncoupling magnets on each track. Next up will be adding Tortoise machines to the 2 turnouts out of reach and a ground throw on the other that is easily reached. Here is an in progress photo. The kaolin cars were just used to test the track and do not represent cars that would be spotted here.

So progress has been made. I need to next tackle the final track in Sheldon Jct., which I have not touched since putting in track about 5 years ago. I have also started to lay out the track in Morrisville for the yard, engine house and assorted industries. This I may do next because it is pretty much finalized. I also have the track for the talc mill in Johnson, some B&M track in Whitefield, the B&M track in Groveton for the other paper mill and the track up on the North Stratford shelf. Hopefully I can keep at it and meet my goal of hosting an operating night sometime this winter.

Monday, July 25, 2011

Heat Wave

Has it been hot enough for you? At least most of the country has been at or near 100 degrees this week. Yikes, nowhere to go but the basement I suppose!

Well, I have not been real good about posting something at least each month this year like I planned. It was April, and now July is almost over! Well, let me post some stuff to get back on track.

I will have my layout open for the New Jersey Division Meet on September 10th. Check out njdivnmra.org for more info. It will also be open again in November on a date TBA for model railroad month as part of the MD-DE-PA-NJ full month of open layouts.

On the Free-mo front, I am disappointed that the NER Convention in Warwick, RI will not have a Free-mo set up. The New England Free-mo guys tried real hard to get it to happen, but the convention committee seems to have dropped the ball on having a great addition to their convention. Oh well, these things happen.

I will have my Free-mo modules at the October 29-30 Timonium, Maryland Great Model RR Trainshow. I'll participate with the Capitol Free-mo group. I should have some more updates to my modules, and I look forward to doing some operating amongst the modules set up.

Speaking of the modules, I thought I would share a couple of photos about how I store them when I am not using or working on them. My layout was pretty much designed and all benchwork was built before I learned about and started down the Free-mo path. The layout is not changing, and I am not able to incorporate my modules into the layout. Which is OK because part of doing the modules was to allow me to model a time period after my layout which is set in 1980. So things you would see circa 1996 to 2005 are on the modules and would not be easily integrated into my layout.

So I needed a place to store them safely within the confines of the layout room. I built a set of brackets under the layout and use plastic sheeting to keep dust and debris from above the layout.


The smaller module sits to the side and the legs go underneath. They are safe here and still allow me to work on the layout above with no problems.

These have been in storage since the last Timonium show, but they should be up in the garage in September to get ready for the NJ Division Meet, as they will be on site at the Meet location.

Friday, April 22, 2011

Free-mo Update

A while back, I wrote about my Free-mo modules, but I have not given too many updates. Well, I have been working on them pretty steadily since January to get ready for a display at the Timonium, MD train show on April 9-10. You can see my previous Free-mo posts using the Labels listing at the right.

Started in 2 years ago in the Spring of 2009, my modules were designed to be self-operational as I was the only one who would have any in my geographic area. I have been bringing them out to various NJ Division NMRA Meets since May of 2009. After getting the 2 main modules constructed, I built a small third module to complete the set and have to ends with standard Free-mo interfaces. Here is a trackplan of the modules:


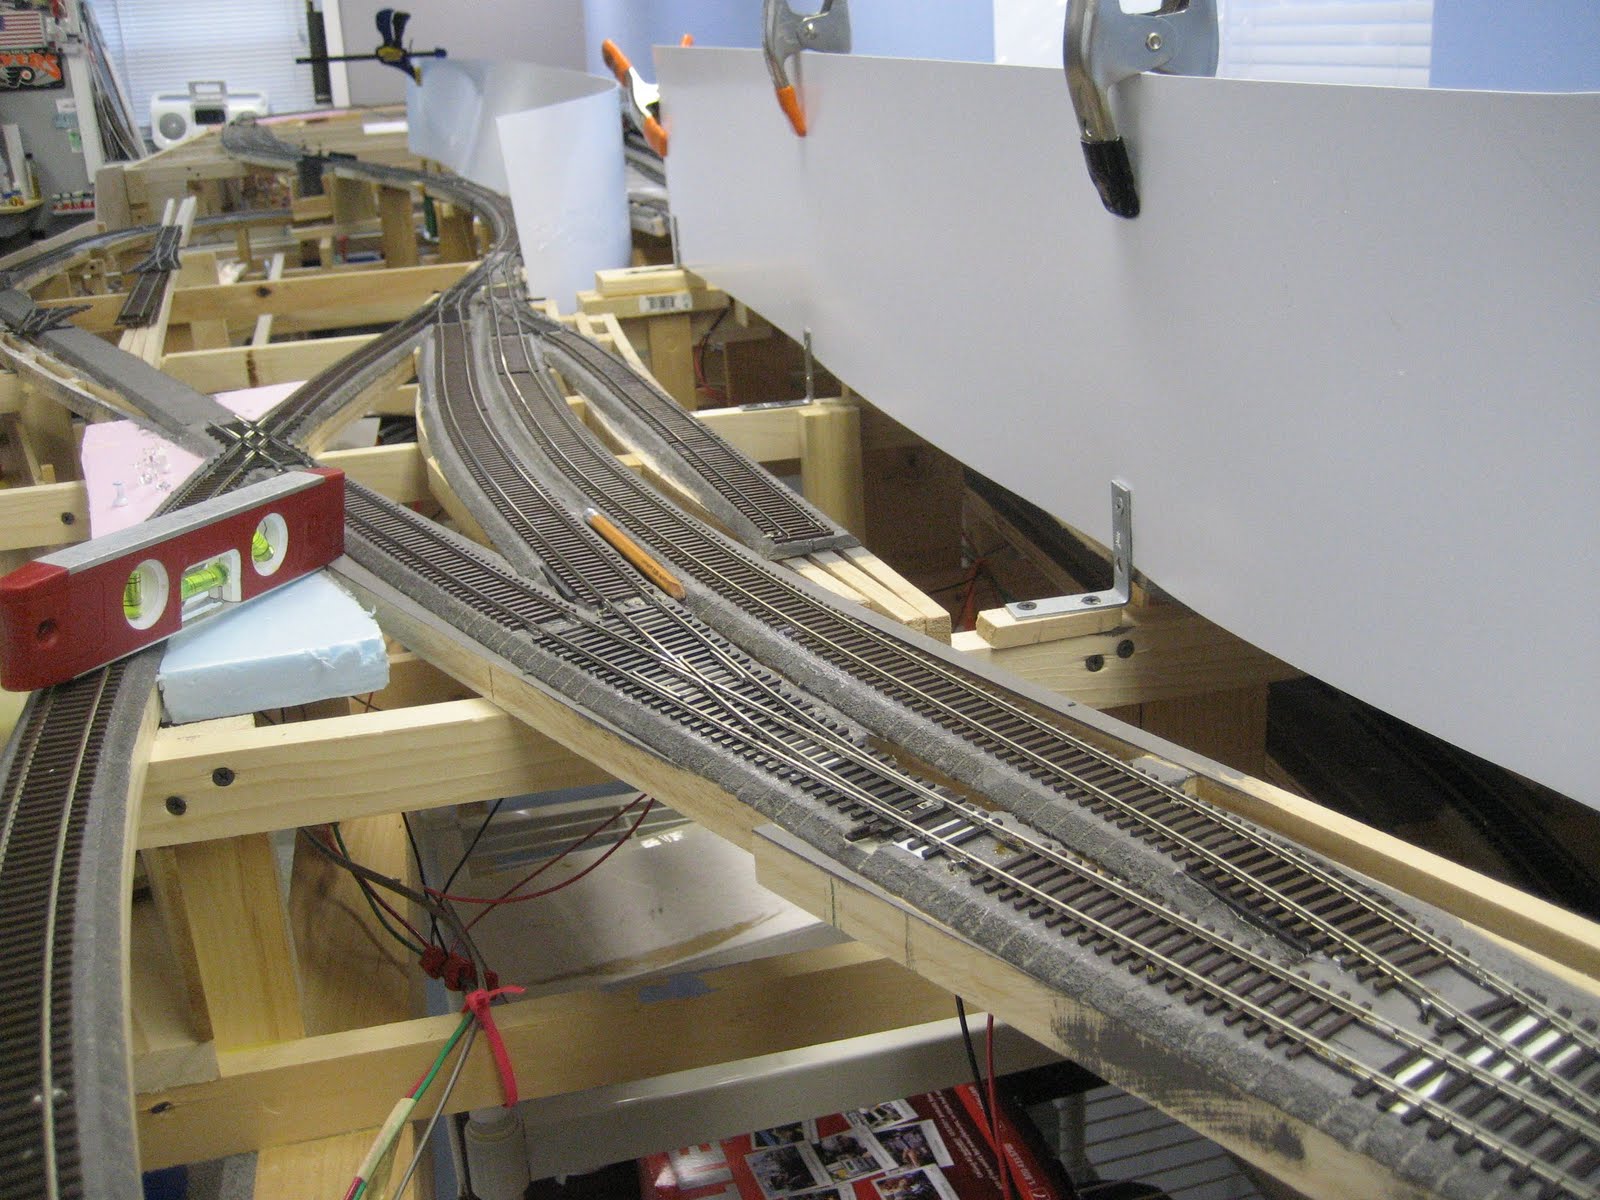
After getting the basic benchwork done, using the ideas presented in the August and October 2008 RMC articles, I completed all trackwork and wiring before moving on to scenic elements. I painted all the track, highlighted individual ties and painted the rails. I then set to start ballasting all track. This always takes a while to get down properly and then totally cleaned up, removing ballast particles from rail sides and on the tops of ties. But it is well worth the effort and really makes the track look great.

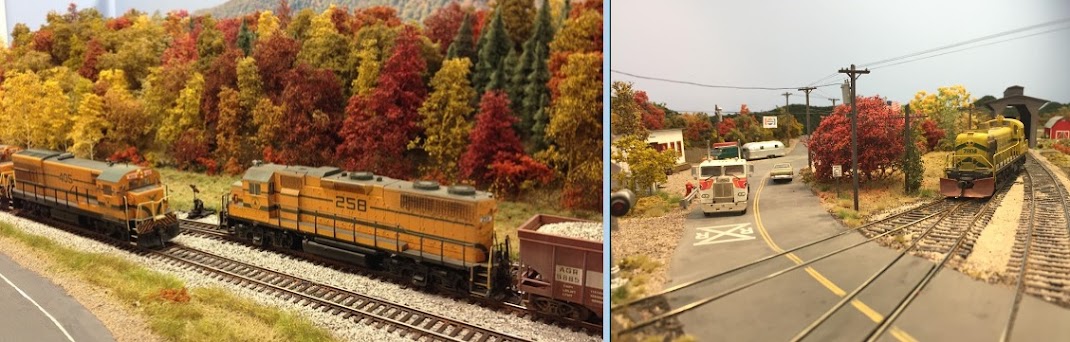
Knowing I had the show in April, where I would be connecting my module to those of the Capitol Free-mo group, who in turn would be connecting to the larger (250' x 75'!) Sipping & Switching Society layout, I wanted to get some base scenery and structures in place and finally stop looking at the plywood pacific of the last 2 years. I used ground foams, real sand, static grasses and Siflor weed clumps to get a base layer in place. Then I spent some time building a few structures. This included a DPM freight depot I purchased around 1984 (prince tag was $6), finished of a LaserKit Yard tower started years ago, a Rix shortline enginehouse and a Walthers background building for a rail served warehouse. I took time to paint all of these so they would not necessarily look like the pictures on the box.

Finally it was time to drive down to Timonium. I left my place real early and headed down I-95. The good news here is that there is a lot less traffic to deal with instead of leaving later when I go to a regular show as an attendee. I met up with the Capitol Free-mo guys and quickly integrated my module into the layout. For the rest of the day and Sunday, I had fun running trains on the Free-mo modules as well as taking my train out onto the big S&SS layout where I was gone about an hour traversing their 1000+ foot branchline track. Lots of fun!

I also had some time to walk the show floor and caught up with some manufacturers, such as Scotty Mason, James Harr at Stella scale models, the guys at Nick & Nora Designs, the guys at Yankee Dabbler (great prices on model railroad stuff!) and others.

I stayed the night at my buddy Anton's place, catching up on his layout and watching some Canadian Pacific Alco DVDs. Anton is also a member of the Four County Society of Model Engineers and he was there at Timonium with his club as well. All in all a great model railroad weekend.

Here are some pictures from the set up. I hope to return again in October for the Fall show.


For now, I will put the modules back into their storage location under the layout as I want to get back to working on the layout after spending most of my time on the modules. But I wil get them back out before the Fall for some more work as I hope to also take them up to Rhode Island for the NER convention, plus local NJ Division NMRA Meets, and the October Timonium show. Hopefully I can get most of the scenery completed and maybe start work the remaining structures. That would pretty much complete the modules. Either way it will be fun just to operate on them, alone or part if a larger layout.

For more info on my modules as part of NJ Free-mo, check out the NJ Free-mo web site. And for more info on Free-mo in general, check out the main Free-mo web site.

Friday, March 04, 2011

Hydrocal Structure Kits

Continuing with my structure building bug that has hit recently, I built 2 structure kits based on Hydrocal wall castings. The impetus for building these came from my recent acquisition of Motrak Models latest HO kit, the brick supply shed, item #87602. Jeff at Motrak asked me to do a review of the kit on the ModelRailCast podcast, so I knew I wanted to get building it sooner rather than later.

The other kit, well, that has definitely been a 'later'! The CC Crow Safety Hook & Ladder building kit has been on my shelf for about 20 years. I knew I would always get around to it, but there it sat. So instead of building one Hydrocal based kit, I thought it would make sense to build both at the same time and take advantage of doing each step needed on both kits.

A full review of my building experience will be on an upcoming ModelRailCast show. I'll post the exact show number here when it is available. But I'll hit a few highlights here. First, couple of pictures of the completed kits.


Here is a look at the Motrak kit unpacked:


I started construction by first spraying each wall white primer, with light coats. After drying overnight, I applied 2 different red colors to get a brick color I liked. Then I used Durham Water Putty, supplied in the CC Crow kit, to do the mortar. This took some trial and error to get just the right amount, but I do like the results.

I painted the windows and added the glazing, then inserted them into the openings. The CC Crow kit includes strip wood to cut for the window frames top and bottom, as well as the full frames for the small windows. This made them look more unique in my opinion. Here are the walls while the windows were going in:


With each wall done, I assembled the basic boxes and used some clamps to lightly hold them together.

You do need to be careful when working with Hydrocal parts as they are very easily broken. I did have some trouble with the CC Crow kit breaking but each one was easily fixed, except for one which did not go back together invisibly. I used some small gauge wire to hide the break, making it look like a conduit or hose running from the upstairs window down to the ground.


The CC Crow roof was also cast Hydrocal. I painted the top silver to look like metal roofing, and the edges white to look like wood trim. The Motrak kit uses black paper to represent tar paper. I used 3M Transfer Tape (available from Fos Scale web site, and others), a first for me. I really liked this product and will use it extensively in the future. It is not real cheap, but the results are great. It lays down an impossibly thin sheet of double sided stickiness that is really easy to then overlay with shingles, tarpaper, etc. I recommend giving it a try.

All in all these were a lot of fun and went together in only a few evenings. Most of the work is paint and finishing. I used chalks to add some weathering to the sides and roofs, but most of the details are in the castings. These really stand out in a sea of wood-based structure kits, and also look different next to a styrene based brick kit. So give one a try. The Motrak kit is definitely good for a beginner (which I was with hydrocal before these kits). Check out motrakmodels.net for all their products, as well as this kit, which lists for $25.


Thursday, February 24, 2011

Three Little Sheds

As Bob Marley says in Three little Birds, "Every little thing...is gonna be alright"! Well, if you have this kit in your stash, I recommend pulling it out and getting started on it. It goes together easily and quickly, and you should have no problems with these at all, mon!


These three little sheds I built from a kit by KingMill called 3 Sheds at Cohasset. I built these as directed in the kit's instructions, including ideas on painting. The instructions are good and you should read through them all first as it will make assembly easier knowing what is coming later.

The walls were painted gray first and then drybrushed with Aged White over that to give the effect of peeling paint. I think that technique is pretty effective and I recommend giving it a try to see what effects you can create.

The roof material (self stick shingles and tin panels) was painted LV Cornell Red by airbrush. However after installing the roof, I still had to go back and repaint and touch up, so I m not sure painting it ahead of time really saved me any time or effort.

I finished these off using weathering powders from Bragdon, using grays on the walls and rusts on the roof, with some black applied sparingly here and there.


All in all a fun and easy time building these. A good kit for the beginner to the expert. Now, where to put these on my layout?

Here is the kit on the KingMill web site:
KingMill 3 Sheds

Their website indicates that these are sold out right now, but maybe you can find them at a show or hobby shop. You could also send KingMill an e-mail and let them know you are interested in getting these kits run again.


If you have any questions about these or want some photos, let me know in the comments section.

Wednesday, February 02, 2011

Springfield Report

[FYI...yes, I updated the look of the blog. I figured after 5 years it as getting kind of stale]

Just back from the Big Hobby Show in Springfield, Mass. My second time there, I went up with my buddy Anton and also his father this year. We left Friday morning hoping to avoid the rush hours, but we still had lots of traffic going up I-95 and it took us about an hour and a half longer than usual. We arrived in Palmer in mid afternoon and had lunch at the Steaming Tender. Pretty good food and a beautiful station restoration. Hokey old music was a tad too loud, but all in all pretty nice. We went outside and watched some of the action as a CSX train passed and the New England Central sorted cars. That is the restaurant and next is my buddy Anton next to the 12 foot icicle hanging from the side of the depot.


We were waiting on the northbound Amtrak Vermonter hoping to watch it do its reverse maneuver. It was getting late so we headed towards Springfield and in about 10 minutes heard that train 56 was due into Palmer in about 15 minutes. We quickly found a side road and stood trackside as the Vermonter passed at 61 mph. Here is some video from Palmer. I unfortunately screwed up the Amtrak recording so it is very short.


We stayed in the Hampton Inn in Springfield and it was pretty much filled with people there for the show. Almost like the convention hotel at an NMRA event. We headed to the show about 45 minutes early and waited in the car until about 15 minutes before the doors opened, then we got in line. We decided to focus on the biggest building first, the Better Living Center. I quickly found some Atlas Kaolin tank cars I needed for the paper mills on my layout and then came across Dave from Perkins Road Depot. He had wonderful custom painted and modified freight cars including some great wood chip hoppers. I had to have some!


Other highlights included talking Flyers hockey with Mike Baker at Nick & Nora Designs, watching (and buying) 2 Blu-Ray DVDs on the CP/CN and the Pan Am/Guilford, saying hi to Dave Frary, and coming across other people I see but once or twice a year. Also checked out the latest kit from Stella Scale Models. I need to finish my New Erie Cafe before buying another one! Also looked at some great images by the guys at The Pixel Depot. Really nice shots of prototype railroads.

For the next 5 hours we walked the BLC building before declaring it complete and then spent the next 3 hours walking the Stroh and Young buildings before calling it a day. Mainly took advantage of show specials throughout the building to add to my goodies bag. We left about 15 minutes before the show ended. This helped us get out of the parking lot and get a seat at a restaurant before everyone else did. Apparently the attendance on Saturday was around 11,500 and totaled out somewhere around 21,000 for the 2 days.

On Sunday we walked the Mallery Building. Said Hi to Mike Rose and Scotty Mason, took advantage of great prices on Tsunami sound decoders and the Soundtraxx instant $5 cash back program, and picked up an EOT flasher that I can use with my Free-Mo modules (I pretty much model post-1990 on that as opposed to the layout where it is firmly 1980). Got to meet Jeff Adams of Motrak models, who I had previously did an interview via Skype on thr ModelRailCast show. Picked up some loads and his latest kit and Jeff gave me the 15% ModelRailCaster discount. Met Ron Kosmider of LaserModeling3, a relatively new company and pretty young guy for a manufacturer. They had 3 really nice kits, but they are a bit early for my layout. But he did show some nice simulated embossed tin panels that I can use for modeling the ET & HK Ide building. Finally something that looks like the siding on that building! Also talked to Atlas and found out that the long awaited (by me at least) GP40-2W locomotives should arrive in April. This will finaly give my Guilford SD26 company on the Free-Mo module.

All in all a great time and well worth attending. Looking forward to going next year and possibly arriving earlier to catch more trains in Palmer.

Friday, January 14, 2011

Happy New Year

I have not been real diligent in posting updates and info to the blog. I'll see if I can remedy that this year and put more info out there. Anyway, Happy New Year to all that follow or otherwise come across my blog. This blog works in conjunction with my main web site, nekrailroad.com. That has more static type information about the layout while the blog is more about in progress stuff and updates.

I thought I would start of 2011 with some updates on layout building progress in the past year. As previously mentioned, I completed the staging yard for Portland/Newport (double ended serving as staging for 2 different mains, MEC and CP). After that was in, I started to figure out how to get the track from the MEC up to the new shelf I added for North Stratford. Here is a pic of the "ramp" that gets a train there. It will be hidden behind the backdrop as you will see later. Building it was done with laminated spline and simple risers. It was kind if like those old train and trestle kits I had as a kid that raised the track on a figure 8 so it could pass over itlself!


Next up was installing the long backdrop behind Whitefield and Crawford Notch. I again went with styrene and here are some in progress building shots. if anyone has specific questions, just use the comments section here.


I then painted the styrene blue and started installing photo backdrops. Here is a couple of views of the completed backdrop. I'll post some more with the photo backdrops in place later.


One thing I did not do this past year was post updates from my trip to the Fall NMRA convention. I actually attended 2, one in Burlington, VT and the other in Princeton Jct., nearby here in New Jersey. I just got caught up in things and didn;t have time to post daily updates. I did however post photos and a video from the Burlington VT convention. Check out the foloowing 2 links to view those:

NER Burlington Photos
NER Burlington Video

My other activity going on this past year or so was building a Free-Mo module set. I think I did post something about Calais, Maine a while back as my design choice for the modules. I need to add a page to my web site about the modules I suppose. The only real drawback is that I cannot configure them into the layout. However I plan to take advantage of them being separate to model more up-to-date stuff that would not fit on the layout. I plan to share more info about building the modules on the railroad-line forums. For now you can check out njfreemo.org for more info and some photos.